Monday, August 31, 2009

Cheap, easy way to display/frame kids' art projects

The girls are starting to really draw and paint. I know one of the important rules for parents looking to encourage their kids is to display their art on occasion. Unfortunately in our apartment our refrigerator is hidden out of view, so that old standby won't work.

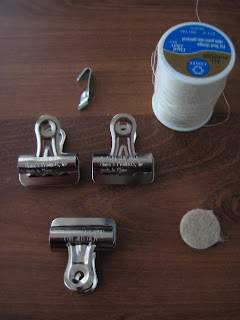
So I set out to find a substitute with minimal nails and tape on the walls. Here's what I came up with. The key ingredients were black poster board from the drug store and three bulldog clips at an art supply store. Then out of our tool/sewing kit I got some thread, picture hanging hooks and a little felt pad. I hooked the picture hanging hooks UPSIDE DOWN on our moldings. Then I tied thread to the part of the hook where the nail would ordinarily go. I tied a bulldog clip to the other end of the thread. I repeated this four times and was ready to hang two pictures in our formerly drab hall.

I used a third bulldog clip to keep the pictures weighted down. The only problem was when you'd walk down the hall, the clips would move a little and make a little metallic banging sound. So I used the felt pads (the little kind you put on the bottom of chairs to protect wood floors) to put on the back of the bottom clip. That stopped the sound and actually damped the movement.

The best part is, I can easily swap out the paintings for their next big work of art.

The "ingredients" are pictured below:
Saturday, August 29, 2009

Did the digital television switch make your reception worse?

It did for us... But fortunately it was a pretty quick fix. It turns out that some of the stations actually changed channels as part of the switch. So you have to deploy the "rescan" feature in the digital converter box menu. That was all we needed.

Apparently in some cases that doesn't do the trick and there is this more complex "double re-scanning" trick to try in that case.

Wednesday, August 19, 2009

Making foaming hand soap refills for toddlers

I'm a big fan of using foamy soap for teaching my girls to wash on their own. Because the product is basically diluted soap, it wastes less if they go overboard and also it washes off more easily. With H1N1 season coming I imagine we'll be doing lots of handwashing.

On that note, I've been researching the best way to make a refill. Just adding regular liquid soap to the pump clogs the mechanism. One website I found said to dilute liquid soap with boiling water (I could see how this would dissolve the soap without creating bubbles as happens with shaking). Others suggested a variety of ratios of liquid soap to water. One place suggested 1 oz. Dr. Bronner's to 5 oz. water -- Dr. Bronner's is already so liquidy it's easy to work with.

I ended up going 1 tablespoon standard liquid soap to 3/4 cup water. I combined them in the soap dispenser and shook them up. So far so good. That's a 10:1 water-soap ratio which I read was best for not clogging the soap bottle.

Besides being a cheaper way to go than buying the pre-made foaming soap refills, making your own foaming soap can ensure eliminating an ingredient commonly used to make the soap foamier: SLS. (Sodium Lauryl Sulfate). While I am not super hard core about trying to avoid SLS, it's not something you really want to have in EXTRA doses. There are some pre-made foamy soap refills that don't have it like this Kiss My Face version.

Part of me was also excited about making my own foaming soap because I thought I could make an unscented version. I know scent free is supposed to be best for sensitive skin. But when it comes to my toddlers who are adamant about independence when hand washing I like something with a strong fragrance so I can tell easily if they've washed or not. I ended up used the last of this lemongrass soap I had on hand.

Tuesday, August 11, 2009

DIY Summer Camp

This is less on the green side and more on the cost cutting side... A friend just forward this AP article about DIY Summer Camps that parents are putting together in these tough economic times.

Monday, August 3, 2009

Potty training twins - together or separately?

A blog post in today's New York Times about Potty Training and the Economy pushed me to write out my thoughts on potty training twins separately.

Before potty training, pretty much every twin parent I talked to had taught their twins to use the toilet at the same time. But in our case it turned out differently (my daughters are fraternal in case that matters). I tried once with both of them around 22 months. After 3 days I threw in the towel figuratively -- that was after throwing loads of literal towels onto pee. None of us seemed happy with this experience.

I tried again around 25 months. One of my daughters then was simply ready before the other. She had used the potty to go poop for many months and seemed really interested. My other daughter was interested too, but seemed really undone by peeing all over herself and the floor or ground. She'd be upset and repeatedly asked for a diaper. So Ms. A transitioned to underwear (albeit with accidents over the course of a month) and Ms. B stayed in diapers. They both seemed happy with the outcome.

Fast forward to this month, Ms. B has been asking to wear undies, so the past 3 days she's gone diaper free. It's been A LOT easier to work with a 2.7 year old on using the potty. She has a lot more control... within 3 days she was accident free.

So contrary to what I learned, it may sometimes work out that twins learn this skill at different times. Because as much as it's been easier with Ms. B at 2.7 years, it was definitely the right thing to do with Ms. A months ago. She was clearly proud of mastering the potty skill and she's also become a lot more temperamental as the 2's go on - so I could see the two of us having control issues if we were trying now. It's not ideal to have to carry around both diapers and potty accessories, but the upside is that you can focus on each individually and the added plus for me was it was a lot less overwhelming...
LinkWithin Related Stories Widget for Blogs